


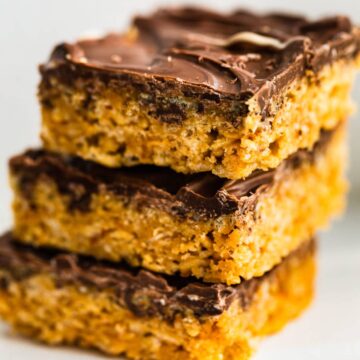
This healthy rice krispie treats recipe is made with better-for-you ingredients and no marshmallows, but tastes just like the classic treats you know and love. Crispy, sweet, and quick to make, the treats are naturally gluten-free, dairy-free, and nut-free-friendly, making them perfect for packed lunches and parties!

These healthy rice krispie treats are one of those recipes that blur the line between snack and healthy dessert in the best way. Of course, they have the same chewy, crispy vibe as the store-bought treats I grew up eating. However, the ingredient list leans a little more nourishing and balanced, free from artificial flavors and artificial colors, and lower in refined sugar than traditional Rice Krispies treats.
It still offers the sweet flavor you know and love, but with a slightly elevated twist, letting notes of vanilla and honey or maple syrup shine through. Think of these treats like a combination of my crispy peanut butter protein bars and store-bought cereal treats! With simple ingredients, they’re a favorite with kids and adults.
Ingredients and Notes
Please be sure to scroll down to the recipe card below for the complete ingredient list and instructions!

- Nut Butter – I’ve tested this recipe with creamy almond butter, cashew butter, and sunflower seed butter, and they all taste great. Peanut butter also works if peanuts aren’t a concern.
Flavor Note: Almond butter keeps the flavor light and balanced with a naturally creamy texture, while cashew butter leans a bit richer and more indulgent. Both work really well. It just depends on the flavor you’re going for.
- Sweeteners – I use a combination of honey or maple syrup and raw sugar (cane sugar) to create a sweet flavor and sticky consistency so the bars hold their shape.
- Flavor Enhancers – Pure vanilla extract and a pinch of salt add depth to the bars, making them far tastier than store-bought options.
- Melted Refined Coconut Oil or Butter – This helps combine the ingredients while keeping the rice krispie treats dairy-free. If keeping the treats dairy-free or vegan isn’t a concern, unsalted butter works well, too.
- Crispy Rice Cereal – Use a certified gluten-free crispy rice cereal, as many traditional brands contain malt (from barley). Brown rice cereal works well as a gluten-free option with a similar texture and a slightly nuttier flavor. I don’t recommend using puffed rice cereal because it’s much lighter and doesn’t hold to the sugar and nut butter mixture very well.
How to Make Healthy Rice Krispie Treats without Marshmallows
Before you begin, line a square baking pan with parchment paper or wax paper, letting it hang over both edges. This makes it easy to remove the bars! Or, grease the bottom, sides, and corners with cooking spray, coconut oil, or butter.
- Combine wet ingredients. Whisk the nut butter, honey, and sugar in a saucepan over medium-low heat on the stovetop until the mixture is smooth and begins to bubble. Make sure to stir constantly to prevent burning!
- Add the remaining ingredients. Remove the pan from the heat, and stir in the vanilla, salt, and melted coconut oil (or butter). Then, gently fold in the cereal, coating it completely.


Note: Adjust the cereal as needed. Start with less, then add more if the mixture feels too sticky. You’re looking for well-coated, not dry.
- Set. Transfer the cereal mixture to a square baking pan, gently pressing it into an even layer with a spatula or greased hands. Chill the treats in the fridge to help them set.


Pro-Tip: For that classic Rice Krispies treat texture, avoid pressing too firmly into the pan. Overmixing or compacting can crush the cereal and result in dense bars.
- Serve. Use a sharp knife to slice the cereal slab into bars. I like to let the bars come back to room temperature before serving to keep them soft and chewy.


Possible Mix-Ins and Variations
I kept this healthy rice krispies treats recipe simple for an easy, no-bake dessert, but that doesn’t mean you can’t get creative! Feel free to switch up the flavor with options like:
- Flaky Salt: Sprinkle a pinch of salt over the bars before chilling for a sweet and salty combo.
- Mix-Ins: Fold chopped nuts, dark chocolate chips, coconut flakes, freeze-dried strawberries, cranberries, or sprinkles into the cereal mixture for extra flavor and crunch.
- Topping: Melt chocolate chips in a microwave-safe bowl, and drizzle them over the bars. Or, dunk the treats into the melted chocolate mixture, and let them set at room temperature or in the refrigerator for an extra indulgent flavor.
- Protein: Stir one to two tablespoons of protein powder or collagen with the nut butter mixture, adding a splash of dairy-free milk as needed to loosen it up.
How to Store
Once set, leftover healthy rice krispie treats can be stored in an airtight container at room temperature for up to 5 days. Or, keep them in the fridge for up to 2 weeks, bringing them back to room temperature before serving.
You can freeze sliced treats in an airtight container with parchment between layers for up to 2 months. Let thaw at room temperature for 10–15 minutes before enjoying the best texture.
More of Our Favorite
Gluten-Free Treats

Healthy Rice Krispie Treats Recipe
- Total Time: 30-35 minutes
- Yield: 10–12 squares 1x
- Diet: Dairy-Free, Gluten-Free
Description
Skip store-bought options, and make these healthy rice krispie treats without marshmallows for a better-for-you snack that’s crispy, chewy, and sweet!
Ingredients
- ⅔ to ¾ cup (170 g) creamy almond butter, cashew butter, or sunflower seed butter
- ⅔ cup maple syrup or honey
- ¼ to ⅓ cup (50-75 g) raw cane sugar or granulated cane sugar
- 1 teaspoon pure vanilla extract
- Pinch sea salt
- 1–2 tablespoons melted refined coconut oil or butter (for softer texture and richer flavor)
- 3 ¼ to 3 ½ cups (about 120-140 g) gluten-free crispy rice cereal (see notes)
- Optional mix-ins: cocoa powder, protein powder, dark chocolate chips, etc.
Instructions
- Line an 8 x 8-inch baking pan with parchment paper or lightly grease it.
- In a large saucepan over medium-low heat, whisk together the nut butter, maple syrup or honey, and sugar. Heat until smooth and just beginning to bubble, stirring constantly to prevent burning. Don’t overheat.
- Remove from heat. Stir in the vanilla, salt, and melted coconut oil or butter.
- Working quickly, gently fold in the cereal until evenly coated.
- Transfer the mixture to the prepared pan and gently press into an even layer using a spatula or lightly greased hands (avoid packing too firmly to keep them light).
- Chill in the fridge for 20-30 minutes, or until set. Note: Let chilled bars sit at room temp before serving for best texture.
- Slice into squares and enjoy.
- Store in an airtight container at room temperature for up to 5 days, or refrigerate for up to 2 weeks.
Notes
Cereal Options: Use a certified gluten-free crispy rice cereal, as many traditional brands contain malt (from barley). Brown rice crispy cereal works well as a gluten-free option with a similar texture. Avoid puffed rice —it’s much lighter and doesn’t hold onto the nut butter mixture very well.
Texture Tip: For that classic Rice Krispie treat texture, gently fold to coat the cereal evenly, and avoid pressing too firmly into the pan. Overmixing or compacting can crush the cereal and result in dense bars instead of light and chewy.
Protein Boost: Stir in 1–2 tablespoon protein powder with the nut butter mixture. Add a splash of milk if needed to loosen.
Freezer: Freeze in an airtight container with parchment between layers for up to 2 months. Thaw 10–15 minutes before serving for the best texture.
- Prep Time: 5 minutes
- Cook Time: 5 minutes
- Category: bar/snack, Dessert
- Method: Stove Top
- Cuisine: American
Nutrition
- Serving Size:
- Calories: 195
- Sugar: 15.2 g
- Sodium: 15.3 mg
- Fat: 9.3 g
- Saturated Fat: 1.6 g
- Carbohydrates: 26 g
- Fiber: 1.4 g
- Protein: 3.4 g
- Cholesterol: 0 mg


Can I use oat butter or peanut butter?
Hi Joan! You can definitely use a an oat butter if it’s the same consistency as almond butter. If it’s pretty thick, you might need extra oil or even maple syrup to thin it out. Peanut butter does work, but it could overpower the original flavor. Still tasty, just not as much as light sweet flavor, if that makes sense.