Description
Learn how to make an easy gluten-free pie crust recipe with a handful of simple ingredients for a homemade option to satisfy all your baking needs! Dairy-free option.
Ingredients
NOTE - If making a custard-filled pie (like pumpkin pie), bake the pie dough first (par bake) before adding filling to allow some of the moisture in the crust to evaporate.
- 1 1/2 cups (205-215 grams) gluten-free all-purpose flour or homemade all purpose flour blend (without xanthan gum) *see notes
- 3/4 teaspoon xanthan gum
- 1/2 cup butter (8 Tbsp), partially frozen or very cold, cut into cubes (see notes)
- 3 teaspoons sugar
- 3/4 teaspoon kosher salt
- 6 -8 Tablespoons ice water (if you live in a dryer climate, you might need closer to 8 Tablespoons)
Instructions
- Place 1 cup flour into a food processor with the blade attachment. If you don’t have a food processor, see blog post. Sprinkle frozen butter cubes over the flour.
- Cover with the remaining cup flour followed by xanthan gum, sugar, and salt. Pulse in short bouts until butter is broken down into small pieces, about 25 times.
- Drizzle in the ice water. Mix with longer pulses for 10 to 12 seconds. The mixture will turn light yellow in color and the texture will be crumbly. Scrape down the sides with a spatula and pulse again one or two more times. Do not overwork the batter (it should be mealy with bits of butter still visible). If the dough seems too dry to shape into a ball, add 2 Tablespoons more ice water.
- Transfer the mixture to a large bowl or onto a working surface. Shape the dough into a ball (again, do not overwork the batter), flatten slightly into a disc and tightly wrap with plastic wrap. Place the dough in the refrigerator to chill for an hour or overnight (see notes).
- Allow the dough to rest at room temperature for 10 to 15 minutes before rolling.
- To roll the dough, lightly flour the work surface and the rolling pin and sprinkle a little flour on top of the dough. Or roll the dough between two pieces of plastic wrap.
- Start from the center and work out in all directions. If cracks form, wet your fingers with cold water and use extra dough to patch up spots, then roll over the cracks, as needed. Roll until the dough is about ¼ to ⅛ inch thick.
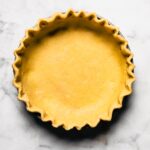
- Transfer to a pie dish by gently rolling the pastry so it wraps around the rolling pin then lay it on top of the pie pan/shell. Remove the excess pie dough and flute the dough. Then proceed with the pie per the recipe’s instructions. See notes for blind baking and parbaking tips.
Notes
Gluten-Free Flour Tips – Each brand of gluten-free all purpose flour will weigh differently per ¼ cup. The range that works well is between 30-34 grams per ¼ cup. If the gluten-free flour has xanthan gum already in it (such as a 1:1 blend), omit the xanthan gum in the recipe. The texture will not be as flaky, but a little more doughy. Regardless, a 1:1 flour blend “should” work.
Prep Tips – For partially frozen butter, place cold diced butter in the freezer for 10 minutes before using. This is key to a flaky crust. See blog post for tips if you don’t have a food processor.
Dairy-free Butter Substitute- Miyokos plant based butter or Earth Balance soy free butter are great options — their high fat-to-water ratio is similar to dairy butter, which helps create perfectly flaky crusts and better baking results.
Storage Tips – Once the dough is prepared, wrap in plastic wrap and place the wrapped dough pucks in the fridge for up to 3 days. For long term storage, place the wrapped pucks in a freezer-safe bag and store in the freezer for up to 3 months. Thaw in the fridge overnight before using in the pie recipe.
Baking Tips – Blind-baking a crust means the crusts are filled with fillings that don’t need to be baked (no bake pies, frozen pies, etc); par-baking means the crusts are partially baked and used for fillings that need to be cooked in the oven, such as pumpkin pie, custard pies, etc.
To blind bake the pie crust before adding a filling, freeze the pie crust in the pie pan for 20 to 30 minutes before baking. Preheat the oven to 375 F. Place 2 pieces of parchment paper or plastic wrap over the pie crust then fill with pie weights. In a small bowl, whisk together 1 egg or egg yolk with 1 Tablespoon water or milk and set aside. Bake for 18-20 minutes then remove from the oven. Carefully remove the pie weights and parchment paper. Prick the bottom of the crust with a fork (don’t pierce through). Brush the base and sides of the crust with the egg wash (not the fluted edge). Return the pie crust to the oven to bake for 5 more minutes or until the crust is golden brown. Cool completely before filling.
To parbake (for custard-like pies such as pumpkin pies and quiches), bake the crust (with parchment paper and pie weights) AT 375 F for 10 minutes. Carefully remove the pie weights and parchment paper. Prick the bottom of the crust with a fork. Brush the base and sides of the crust with the egg wash (1 egg or egg yolk whisked with 1 Tablespoon water or milk), then return the pie crust to the oven for 7-8 minutes or until the bottom is golden brown. Par-baking tips. When you are ready use the par-baked pie shell, add the filling and cover the edges of the crust with aluminum foil or a pie shield half way through baking to prevent over browning.
Glass and ceramic pie dishes heat up slower but more evenly than metal, adjust baking times as needed.
- Prep Time: 10 minutes
- Chill Time: 1 to 12 hours
- Cook Time: 7 to 16 minutes
- Category: dessert
- Method: oven
- Cuisine: American
Nutrition
- Serving Size: 1 serving
- Calories: 176
- Sugar: 1.4 g
- Sodium: 104.7 mg
- Fat: 10.6 g
- Saturated Fat: 6.4 g
- Carbohydrates: 18.2 g
- Fiber: 2.7 g
- Protein: 2.1 g
- Cholesterol: 27.1 mg

