If there’s one thing that I’ve learned the past 5 plus years of blogging, it’s that you learn well and find inspiration from others. Okay, that’s kinda two things, but you get my point. Today’s post is from one of my local blog friends (Min) who inspires me in more than one day. She’s an amazing and talented cook and food photographer, not to mention the most authentic and gentle spirit I know. I only wish I could see her more since living in the same city. Gotta make that happen! Anyway, take notes on this post, and be prepared to get LEARN!
First of all, thank you, Lindsay, for this opportunity to share with your readers on a topic I’m extremely passionate about. – food photography.
When Lindsay first approached me, I was extremely flattered but at the same time felt apprehensive. With the sea of incredible talent out there, I felt unqualified. However, what I do know for certain is that my food photos have come a LONG way since I first began shooting my kitchen creations. Just see for yourself…
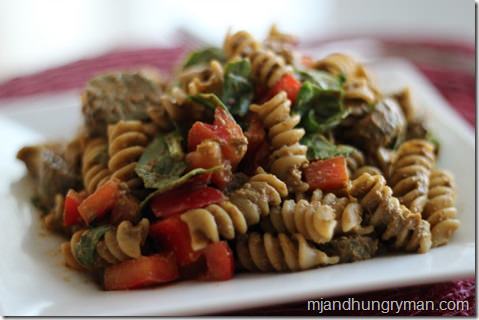
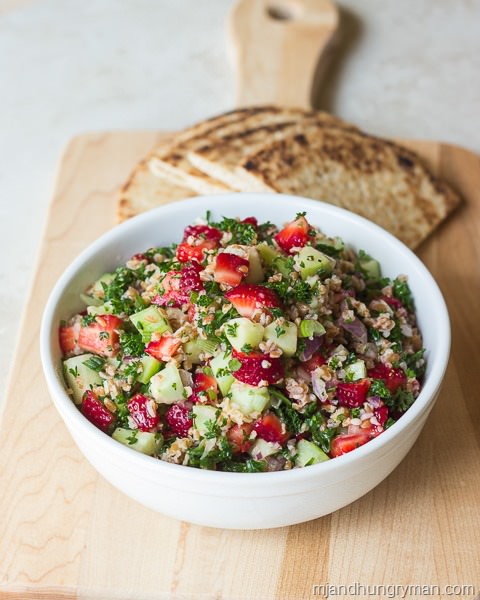
2012 – Sun-dried Tomato Basil Pesto Pasta. It is soo good but doesn’t look so appetizing, does it ?
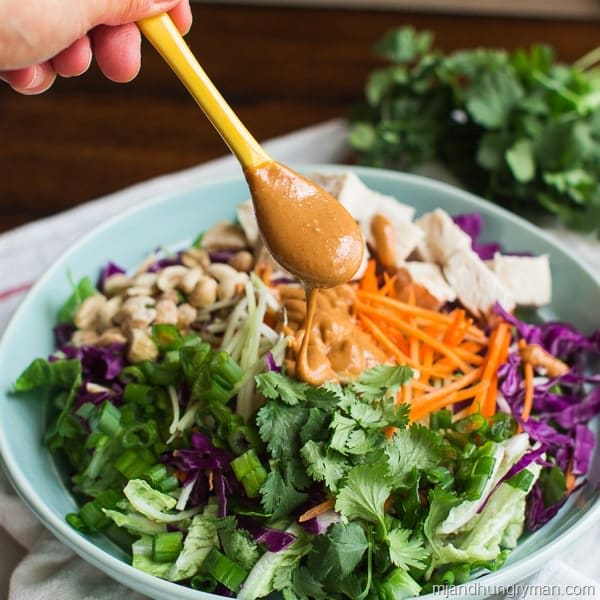
2014 – Much better 😉
As a food blogger, besides having a solid recipe, having good quality photos that beg to be eaten is everything. Even if you have an out-of-this world recipe, if the photos don’t look very appetizing, it won’t take off like you had hoped. Trust me. I’ve been there. Pinterest can be such a cruel, cut-throat world, don’t ya think? And for me, my goal is to make HEALTHY food look delicious and mouth-watering so that more people will try my recipes and get hooked on clean eating. I don’t want to hear any more comments like “that looks too good to be healthy.” The way I see it, it’s “tricking” people but with the best of intentions ;).
I shoot about 98% of my photos with a DSLR, and for those of you who may be on the fence about making such a huge purchase, I know how you feel. It’s not an absolute necessity, but it’s made a world of difference for me personally. And if you really stick with it, it’s an investment in which you’re bound to see a return. You don’t need a super fancy one either. I shoot with a Canon Rebel t3i using a 50mm 1.8 lens – priced at around $125, it is one of the most affordable lenses out there.
The good news is that there are TONS of resources that are readily available at your fingertips. For instance, just Google “food photography for beginners.” You’re well on your way to clicking away with the blinders removed. It might be really overwhelming at first, so take baby steps and try to master one thing at a time. For me, Tasty Food Photography was a tremendous resource!
First things first You MUST have a good understanding of the basics. This means no more shooting in Auto Mode if you own a DSLR! Familiarize yourself with ISO, shutter speed, and aperture. I won’t get into much detail as there are many wonderfully-written and detailed resources out there. I have a Pinterest board as well as this resources page with several helpful links to get you started.
In this post, rather than reiterating what others have already so eloquently explained when it comes to the basics of food photography, I thought I’d instead take a more personal approach and invite you to check out what a typical “shoot” day looks like. I emphasize the word “personal” as I’m not suggesting this is what you MUST follow. Rather, experiment and find a work flow that works for you. This is just to give you an idea ;).
1. Shoot in natural light.
In the beginning, I walked around the whole house with a bowl of fruit and took photos in various spots and at different times throughout the day to answer the questions “When?” and “Where?”
Right now for me, the best time here in Texas is between 11a-1p, when the light is soft and I can shoot right next to THE window that’s designated for photos. I avoid shooting in the early afternoon as the sunlight is way too strong, resulting in blown-out photos. There are ways to work around this, like draping a white sheet over the window or taping vellum to it, but I’d rather not deal with all of that. Keep in mind lighting changes as the seasons do, so you have to adjust accordingly.
So what happens if you can’t shoot during the day? It’s extremely difficult for me to shoot during the prime hours on weekdays so I
madeasked my husband to make me a light box following these instructions. While my photos turned out decent considering it was completely dark when I used to shoot (photos below), I still preferred natural lighting.
Now I just wait until the weekend to shoot. Having said that, if you’re not a stickler for a set schedule like me and want to shoot whenever you can, Lindsay at Pinch of Yum wrote a great post on working with artificial light. I may experiment more with it in the future when I have a bit more time on my hands, but for right now, I’m sticking with what works for me.
2. Get my set-up ready in advance.
Keep in mind you’re working with real food. There’s nothing more devastating than seeing your gorgeous creation melt, collapse, change color, or what have you before you’ve had the chance to capture it. Been there. Done that. Not to mention you don’t want to wait forever to eat the food. You want to be ready to shoot right when the dish is done. Thus, I get my set-up all ready to go before I start cooking or in-between cooking.
This means my camera is on the tripod (I almost always use one) and tethered so I can see the image through my computer screen and get instant feedback.
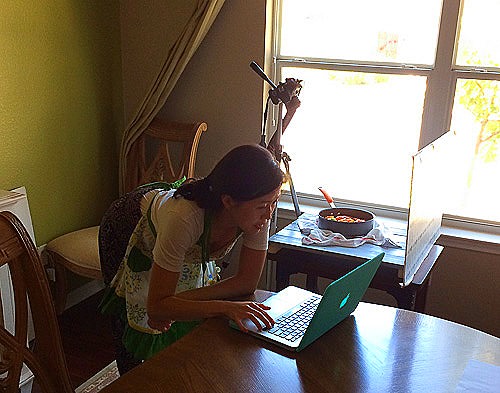
I highly recommend tethering because for me, it really sped up my production time. Additionally, my background is picked, and my props are placed. I may add little extras during the shoot, like a decorative cloth, extra fork, etc. (keep such items nearby), but the majority of the work is already done.
3. I take TONS of photos and constantly move while doing so.
It’s amazing how much of a difference even the slightest change in the shooting angle can make!
Never mind the fact you may look silly doing so. Since my lens doesn’t zoom in or out, it requires me to get into very awkward positions. Just laugh at yourself and continue.
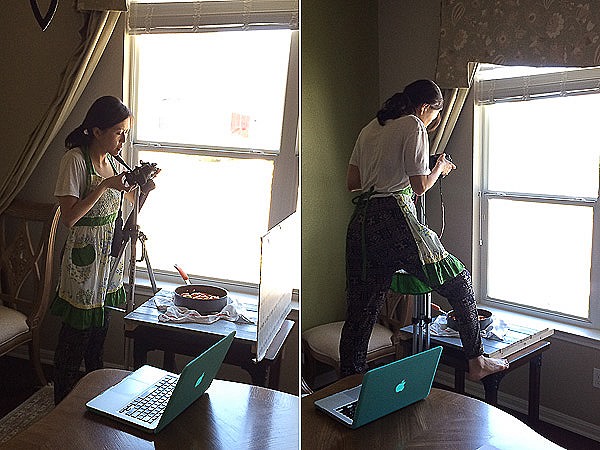
Once you find the optimal time and that perfect location, it’s really easy to fall into the habit of shooting at the same angle or spot in which you are familiar. There’s nothing necessarily wrong with that, as simply “knowing” the light makes the process that much easier. For about a year, I shot every single one of my pictures with the light coming in from the left.
However, after a while, I wanted to move out of my comfort zone and explore new possibilities. That’s how I discovered my new found love for the way photos look with the light coming from the back.

It creates a moody effect, I think. It is also the reason why I no longer use a white foam board to bounce light as much anymore – I’m in the “embrace the shadows” phase. Of course, this could very well change in the future. The key is to continue to experiment. Click away and move your feet!
4. Adjust props as necessary.
After taking several shots, I will look at the photos through my computer and determine at that point whether or not I want to keep it the way it is or add/take away/move around props. I keep everything within arm’s reach for easy grabbing.
5. Use Lightroom for post-processing.
The goal is always to take quality photos in order to keep editing at a minimum. The majority of the time my photos do receive some sort of treatment…sometimes minor, sometimes not so minor. I just want to make sure they “pop.” I apologize if you don’t use Lightroom, but here’s what I typically do:
adjust white balance —> adjust exposure as desired —> bump up contrast and clarity —-> crop the photo —> brighten colors with a little saturation (making sure not to go overboard as it can start to look fake).
Hope you found this post helpful in some way. My biggest piece of advice to you is to keep practicing! One of the reasons why I continue to be drawn to food photography is because no matter how much I improve, there’s so much more to learn!
Isn’t that the beautiful thing about photography? There’s absolutely no room for stagnancy. It encourages continuous learning, practicing and experimenting.
I used to read tons of resources and follow their suggestions to a T, but over time I’ve come to the realization that no rules are set in stone. What’s most important is that you find your own unique groove and begin to develop your own sense of style. It’s still a work in progress for me ;).
[Tweet “Food Photography Tips with @mjandhungryman #fitfluential #foodblogger via @LCCotter”]
Min
Follow MJ (Min) below for more fun projects and delicious healthy food!
- http://www.mjandhungryman.com


I just picked up a secondhand Canon 80D and am loving it so far. This is an upgrade for me from my very first camera, a Canon Rebel T2i. I’m an advanced novice, if that’s such a thing, or perhaps a “green” enthusiast. Point being, I know my fair share but still have much to learn.
My question is whether the 80D’s weather sealing can stand up to constant moisture, like out shooting for hours during the rainy season. I read a little about the 80D here: https://www.photographytalk.com/canon-eos-80d-review which mentions that it’s weather-sealed and that it can work in pretty extreme conditions. And I’m sure Canon says sure, it’ll do fine in lots of rain, but I’d rather get the word from someone with experience before trying it myself!
I haven’t used the 8D before. I do like the 7D for video and 5D mark IV for food!
I love taking pictures of my food, but they never look this amazing thanks for the great tips.
These are great tips! Natural light I have found to be a huge help to me as well! I’d like to get better at staging. 🙂
Great information…shooting tethered opened up a whole new way of working for me, I love it!
I saw a HUGE difference in my photos once I began shooting tethered! You’re def going to love it 😉
Awesome! I have so much to learn! My photography skills are poor!
Hehehe I can totally relate to your points, Min!!! Especially the “embrace the shadows” bit….I love them! A bit too much, though. 😛 Great post, girls, and your photography has been becoming exponentially amazing, Min.
Ps: I keeep wondering if I should tether my camera….but I keep pushing it off because I feel like I’ll be constrained to one single area and it would be hard to move. I’m constantly moving around 3 different spots. But maybe planning it out more ahead of time would help, I would guess?
you both have amazing photography!
Oh shucks….I just love you both so much, and I know we’d be a great trio if we met. 🙂 Although I am a bit sore (and I don’t get bitter easily) that you both met and I never even got a chance! :/ Not yet, anyway. <3
Aww..someday we shall meet! We MUST. In regards to tethering, the cord is long enough that you should be able to move freely. However, the overhead shot is a bit rough so I just take it off. Planning in advance is def key!
very helpful, thanks!
Awesome tips, which I need!! The first step? The big DSLR purchase. I’m constantly going back and forth about this but feel like it’s worth the splurge, if that’s my passion! Love both of you ladies!
i think it depends on how much you want to invest in food blogging. I say, if it’s your passion, go for it! use it as a tax write off to get the camera
I totally agree with Lindsay. I purchased my DSLR when photography wasn’t even my passion. Thank goodness I ended up being OBSESSED with it. It is def worth it ;). Love you too, Alanna!
Great tips! The airline just took my camera… grr… so I ordered a model up from what I had, a cannon g16… I don’t think I’m ready for the DSLR investment quite yet!
they took your camera? that’s mean!
Perfect timing! Lioterally looking at cameras right now!
let me know what you decide!!
and this is why I will never be a food blogger, but it is fascinating to know the work that goes into it!
haha i know! i try but fail often
These are awesome tips – I too got Pinch of yum’s Tasty Food Photography – I recently won a DSLR – a Canons T3 with a 18-55 lens and a 50mm lens – I still have so much to learn – I just began to venture out of shooting in auto – so loved the encouragement to shoot in manual! Loved the lighting set up – I was in the process of following this DIY light making http://thetiptoefairy.com/blog/2014/01/diy-soft-lights-photography-blogging.html
Thanks so much Lindsay and MJ
You won it? Wow! CONGRATS! You’re going to have so much fun learning 😉
Great post! I always need food photography tips!
your pics are great!
Honest – I wish I cared more! 🙂 BUT I am not a food blogger so…. but love the post!!!!
I am trying my DAMNEST to up my game when it comes to food photography and I am pretty darn PROUD of myself… That being said, There is ALWAYS room for improvement! But hey, I ain’t winning any awards and I am totally cool with that.
word up! LOL!
Love these tips! I just bought my camera last weekend and trying to figure out where to begin.
Ooh! Congrats! Let the fun begin 😉
Great tips! Thanks so much for the post Min!
As someone just starting out, I can’t thank you enough for sharing your tips! I still have to make the plunge to buy a DSLR and have a ton to learn!
keep us posted on the progress!
These are such great tips! I, too, love that there’s always more to learn in food photography!! Thanks!
me too! always learning!
Thank you so much for sharing this! I am very very new to food photography and still have yet to invest in a real camera. I have been learning and picking up little tricks along the way but I still need lots of improvement. Pinning this post for future reference! 🙂
We all do! keep us posted on the progress. xxoo
Love it, thanks! I’m so darn lazy. That’s my #1 problem. I’m like, well the DSLR is upstairs, but the hot and delicious food is downstairs. Guess I’ll just use the iPhone… haha. I loved the behind-the-scenes photos; great insight!
haha agreed. my husband is always starving
Wow – so much that I don’t know!! I am the worst picture taker and food is my weakness – I think because I usually just try to snap a picture right before we eat (2 teenage boys + 1 husband all standing around hungry!!!).
I pinned this because at some point I hope to get a DSLR camera and then I want to really learn what I’m doing with it!!!
oh let me know if you try any of these tips!
Food photography is definitely something I’d love to get better at, so these are some great tips! Thanks for sharing!
Min is awesome. I want her to teach me more everyday!
This is great! Very helpful info. I’m a MAJOR novice when it comes to food photography, so I need all the tips I can get. Great photos and advice, Min! Thanks for sharing with us today.
we need a blogger photography retreat! haha
Fantastic idea!
I feel like I am constantly learning and (hopefully) improving. But then there always seems to be more to learn. Thanks for the tips!
me too! always more to learn
great advice! i do love a good #foodpic.
This just makes me feel guilty… I can’t be bothered with anything beyond an iPhone. Doh. I just wanna eat it…
LOL! same. but the iphone just keeps getting better and better.
If you’ve ever been to my blog, you’ll know that I SO need this. I am terrible with my photos and it just comes down to plain old laziness. I truly need to read this thoroughly and get better. Thank you!
i need a whole month to work on this! LOL!
This was REALLY helpful! Thanks for sharing your talent. Pinning!
MJ is pretty awesome!
Alright Min….that was the BEST tutorial I’ve EVER seen!! Super honest and straight forward. You stinkin’ even included what setting in Lightroom you use–I was hoping you would!!
Thanks so much, that was so cool.
could not agree more!!
Aww thank you so much! I’m glad you found this to be so helpful ;). If you had any specific questions in regards to post-processing in Lightroom, feel free to shoot me an email. I may not have the answer but we can figure it out together ;).
Great tips! I def need to up my photography skills.
Such great tips, Min! I really love what you said about no rules being set in stone. I think the best thing you can do is grab your camera, throw it into manual, pick a subject, and then just start shooting away from different angles and in different settings. It’s intimidating to step out of auto mode for sure, but I found it’s what made the biggest difference to my photographs.
Thanks, Amanda! You’re absolutely right. Practice makes perfect! 😉
Great tips – thanks for sharing! I have a LOT to learn still but I’ve definitely made some major improvements even in just the last few years of blogging (and with all pictures coming from my iPhone)!
the iphone is pretty decent, i would agree.
Great post! I am newer than a newbie on this subject but since I’m posting recipes and meals it’s something I’ve started thinking about for sure. Thanks for getting the ball rolling for me – great tips!
I love these tips! I actually have a post like this planned..we’ll see when it actually goes up but I do agree that natural lighting is KEY and that a DSLR camera, while a huge investment, makes a biiiiig difference.
I can’t wait to read it!
This is so helpful! I am still working to improve my pictures although I’ve made some progress over the past year:) I use my iPhone 5 so not very fancy but I’ve found editing in pic monkey helps a little. I’m excited to check out the resources you shared. Thanks for the post!
These are great tips! I actually just signed up for a photography class at a local university so I’m hoping I can master my DSLR!
Ooh! I’d love to take photography classes too. You’ll have to let me know how it was 😉
OH, this is so helpful. I am trying to up my food photo game, and it is slowly, slowly happening, but still… so much room for improvement!
DSLR is something I’ve been wanting for a long time but I can’t afford it at the moment. What is tethering, by the way?
Hi Linda! Sorry I didn’t explain..Tethering is basically connecting your camera to the computer via cord so that whatever you shoot, you can see directly on your computer. The bigger screen helps A LOT when it comes to reviewing and adjusting your photos. Hope this helps!
This is a great post! I could never afford a DSLR until I graduate school and start paying off some student loans but I am saving up all of this great information for when I can!
LOVE Min! LOVE this post! I learned so much! Thank you both!
Thanks, Danielle! I’m glad you found this helpful 😉
I love seeing pictures of photo shoots, so thanks for including those! I am always trying to grow and learn in the area of food photography, so I loved this post.
Thanks for the great food photo tips! I’d like to improve my skills for the few food photos that I take for my mostly running blog.